Sunday, January 27, 2013

Uninstall SQL Server Instance

How to uninstall an existing installed SQL Server Instance?

This blog will guide you how to uninstall an existing installed SQL Server Instance. If you have multiple installed instance of SQL Server in your local PC then this blog address your problem. Please follow the steps provided below.

First and foremost, go to Control Panel and select the Microsoft SQL Server 2008 (64 bit) entry from the list. Once selected, click the Uninstall/Change menu from the panel. See the image below.


After clicking of the Uninstall/Change button, the SQL Server Uninstallation Options will be displayed. From there, please select the Remove link. Please see the image below.


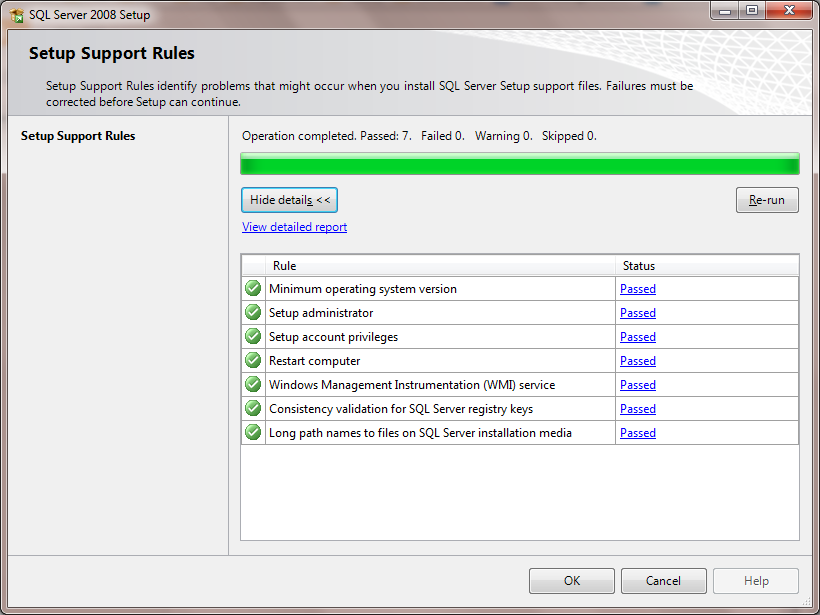
The Setup Support Rules will then check the system requirements. Ensure that all Rule is passed otherwise you need to fix it (and the un-installation cannot continue). See image below.


Just click the OK button if you see all the entries are pass.

In the next window, select the SQL Server Instance you wish to remove or modify. In our case, we are removing our existing installed Express edition instance. Just simply select the proper entry in the 'Instance to remove from' field.

See the image below.


Once you select the proper entry, just click the Next button to proceed. The next window will show you what features are you going to remove from the SQL Server instance. Our advice is to select all features installed the current selected SQL Server instance. See the image below.


Just click the Select All button to select all entries then click the Next button. After that the next window will display the removal rules. See the image below.


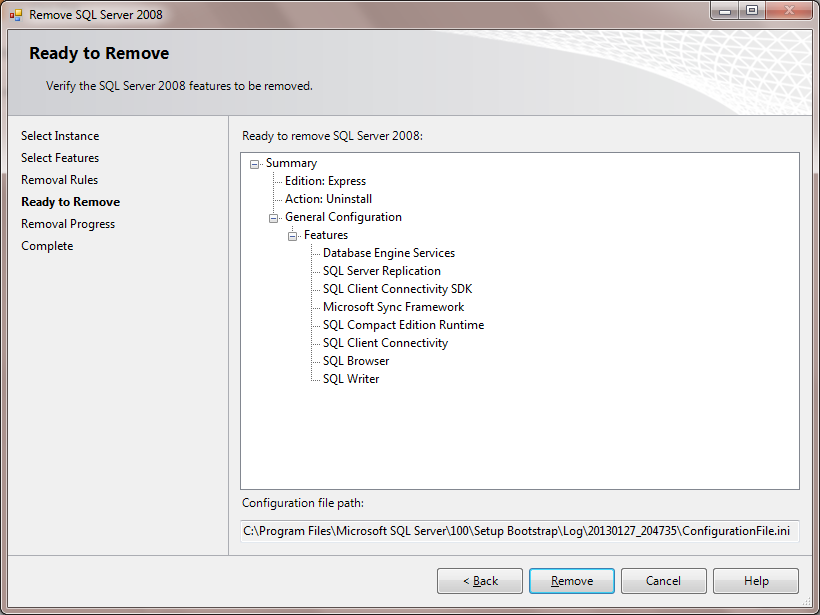
Click the Next button. In the next window the Ready to Remove dialog will be displayed to confirm to you the list of features to remove. See the image below.


If you are sure to remove the features just click the Remove button, otherwise click Back button to reset the features to remove. In our case, we will just click the Remove button.

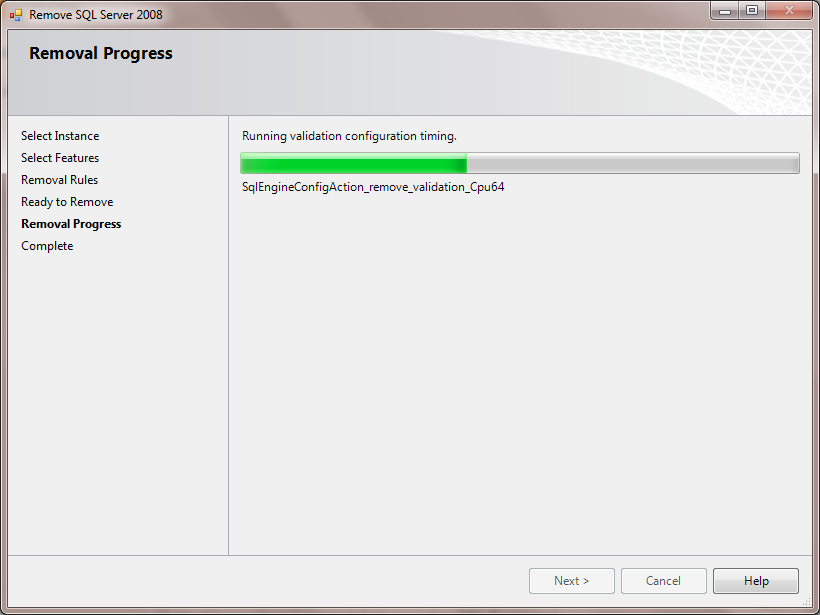
The removal progress will be displayed in the next window. See the image below.


Once completed, just click the Next button and in the next window it will only display the link to the log file for your un-installation report status. Just click the Close button to close the window. See image below.


Other Solution

Alternative solution from Microsoft can be found here.

Note: You need to restart the PC after un-installing the SQL Server instance to have effect in the system. So better do follow the process by restarting your PC to avoid conflicts.

You just learned how to un-installed an existing SQL Server instance.

Saturday, January 26, 2013

Creating a Database and Tables in SQL Server

This blog will guide you how to create a database and tables in SQL Server. The audience of this blog are those who don't have enough experience in SQL Server yet. For those who are very keen in using SQL Server, please skip this blog.

If you have your SQL Server installed in your PC then we are ready to go. Otherwise, please visit the How to Install SQL Server 2008 blog to guide you how to install it.

Creating a Database

Now we are expecting that you already installed SQL Server 2008 Express Edition in your PC. First, you have to open the Microsoft SQL Server Management Studio by clicking the icon from your Desktop. If it has not placed in the Desktop, then please click the Start button All Programs->Microsoft SQL Server 2008->SQL Server Management Studio.

The SQL Server Management Studio looks like below.


By default, it will automatically display the Object Explorer. If you haven't seen the Object Explorer then please go to menu View->Object Explorer or press F8.

After that, click the Connect label located in the Object Explorer to connect in the available SQL Server instance you had created during the installation. See the image below the Connect to Server window.


There you see the Server type, Server name and Authentication type of connection. Usually if you're working locally you have to place the (local) or dot in the Server name. The server type usually Database Engine. If you're working locally or if you're working with windows authenticated environment, then leave the Authentication value to Windows Authentication. However, if you know you're connecting in the secure database you have to provide the authentication process credentials. In the Authentication field select the SQL Server Authentication and enter the Username and Password credential. Click Connect button and wait until the Object Explorer is filled with a new database connection instance.

Select the new database instance and expand it. Select the Databases and select New Database. See below the image.


After clicking the New Database menu, you will see the create database dialog. See below.


In the database name, please type the name of the database you wish to create. The most common name for the database is the actual name of you application (but it is up to you). If you wish to create an advance database, you can modify the Options (type of connection and its properties) and Filegroups to define what schema this database are part of. For your convenient let's just start in the basic functionality.

If you're done with your database name, click OK button. You will notice that the Object Explorer databases node has been filled with your newly created database. See below the image.


And that's all. You just learn how to create a SQL Database.

Creating a Table

If you follow our tutorial above weI created our own database named CodesDirectory. From there, we will start our process by expanding the CodesDirectory database and right-click from the Tables folder. Select New Table menu and it will show you the table designer. From that designer please follow our image below.


Once you're done with your designing, please save the table by pressing the Ctrl+S keys. It will show you a new dialog that prompts the table name. In our sample, we created it as User. See image below.


Now you will notice again that the CodesDirectory database Tables node will have a new entry named User. That is just the table we just created named User. In SQL Server, user has an option to create a database table by user interface or by SQL Text. If you wish to create a table by SQL Text, then you have to learn more in DDL (Data Definition Language) stuff.

Sample below is the way how to retrieve the corresponding SQL Text when creating a table.

Scripting table.


You can choose other option in the Script Table as menu if you wish. But in our case, we just displayed how the User table has been created via SQL Text. Below is the actual script how to create a User table.

USE [CodesDirectory]
GO

/****** Object:  Table [dbo].[User]    Script Date: 01/27/2013 13:49:54 ******/
SET ANSI_NULLS ON
GO

SET QUOTED_IDENTIFIER ON
GO

CREATE TABLE [dbo].[User](
      [UserID] [uniqueidentifier] NOT NULL,
      [Username] [nvarchar](32) NOT NULL,
      [Firstname] [nvarchar](32) NOT NULL,
      [Lastname] [nvarchar](32) NOT NULL,
      [Birthdate] [datetime] NOT NULL,
      [SerialNumber] [nvarchar](24) NULL,
      [CreatedDate] [datetime] NOT NULL
) ON [PRIMARY]

GO

ALTER TABLE [dbo].[User] ADD  CONSTRAINT [DF_User_UserID]  DEFAULT (newid()) FOR [UserID]
GO

ALTER TABLE [dbo].[User] ADD  CONSTRAINT [DF_User_CreatedDate]  DEFAULT (getutcdate()) FOR [CreatedDate]
GO

If you wish to create a database by SQL Text, you need to study more the DML vs DDL. The DML or Data Manipulation Language is an SQL Text in SQL Server that is being used for data manipulation operation. Basic keyword includes SELECT, UPDATE and DELETE. The DDL or Data Definition Language is the administrator task that manipulates around database schema. Basic keywords are CREATE, ALTER and DROP.

How to Install SQL Server 2008

This blog will guide you how to install SQL Server 2008 in your PC.

First of all, if you don't have the SQL Server installer yet then you need visit Microsoft Express Edition SQL Server 2008 and download it. Once downloaded, click the Setup.exe file to install the SQL Server 2008. It will take sometime because you downloaded only the installer file (but you haven't downloaded all the required files to install SQL Server 2008). But if you already have your complete SQL Server files, then we are ready to go.

The first dialog that will appear is the SQL Server Installation Center. See the image below.


From the left, select the menu Installation and select the first entry 'New SQL Server stand-alone installation or add features to an existing installation'. This selection will install the stand-alone SQL Server in your PC (or modify the existing installation if you wish to add other features).

After clicking it, the Setup Support Roles dialog will check your system whether there are possible problem might occur when installing the SQL Server. This is a pro-active feature as it is checking the system configuration in advance. If there are problems found in your system, you need to fix it by following the guidance from Microsoft SQL Server installer guide. Otherwise, the screen below will display.


Just click the OK button to proceed. On the next window just click the Install button. It will install the Setup Support Files needed and it will then proceed to the installation. See image below after clicking the install button.

Please note that if you have a firewall running you need to disable it temporarily so the SQL Server installation will not be interrupted during the installation for the blocked contents.


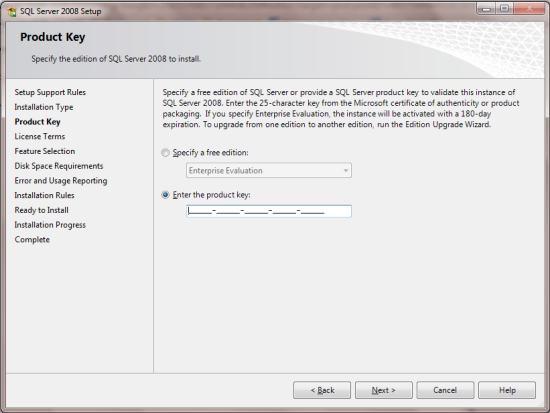
Click then Next button. In the Installation Type, select the Perform a new installation of SQL Server 2008 option and click the Next button again. Enter product key in the next window. See image below.


Click the Next button again. In the next window, you will the License Terms, you have to read it to fully understand what is written in the terms. If you are okay with it already, just tick the I accept the license terms and click the Next button.

In the next window, you will be prompted if what features of SQL Server you wish to install. See below the image.


Notice in the Shared Features, there are disabled check items already. This is because we already installed the SQL Server in our PC and some of the Shared Features has already been installed already. But for the basic feature, please check the Database Engine Services, Management Tools - Basic and SQL Client Connectivity SDK. But note that you can install other features if you wish.

If you are done selecting the features, click Next button. There you will be prompted what instance name you wish to create. For this blog we will be using the default instance.

From the option, select the Default Instance and just click and click the Next button until you see the screen below.


In the SQL Server Agent and SQL Server Database Engine our advice is to set the Account Name and Password as same (just select your windows credential and type the corresponding windows password). But it is all depends your perusal.

After that click the Next button.

In the authentication mode, just select the default Windows Authentication Mode so the SQL Server Instance will automatically use the default windows credential during the authentication. In the administrator account section, just click the Add Current User button so you will be the administrator of the current SQL Server Instance. If you want to add other people in your organisation to be an administrator of this instance, just search their name and add them.

Click and click the Next button again until you arrived in the Installation Progress screen. See below the screenshot.


And once the progress finished, you're done with your installation. Click the Next and the next window will give you an option to see the installation logs. Just click the Close button to close the installer wizard.

That's all the process how to install the SQL Server 2008 edition. Have a happy programming and SQL querying.

Friday, January 25, 2013

PART 2: C# WPF TreeView File Explorer with System Icons

This blog is just a continuation of our previous blog PART 1: C# WPF TreeView File Explorer with System Icons. So please visit it first before continuing in this blog.

And here, we are expecting that you already read the previous blog. Now, you're ready to go in this blog.

Actual Wrapper Implementation

Below you can see the actual implementation of the FileSystemObjectInfo wrapper class that we will going to use in our application.

public class FileSystemObjectInfo : BaseObject
{
    public FileSystemObjectInfo(FileSystemInfo info)
    {
        if (this is DummyFileSystemObjectInfo) return;
        this.Children = new ObservableCollection<FileSystemObjectInfo>();
        this.FileSystemInfo = info;
        if (info is DirectoryInfo)
        {
            this.ImageSource = FolderManager.GetImageSource(info.FullName, ItemState.Close);
            this.AddDummy();
        }
        else if (info is FileInfo)
        {
            this.ImageSource = FileManager.GetImageSource(info.FullName);
        }
        this.PropertyChanged += new System.ComponentModel.PropertyChangedEventHandler(FileSystemObjectInfo_PropertyChanged);
    }

    public FileSystemObjectInfo(DriveInfo drive)
        : this(drive.RootDirectory)
    {
        this.Drive = drive;
    }

    #region Properties

    public ObservableCollection<FileSystemObjectInfo> Children
    {
        get { return base.GetValue<ObservableCollection<FileSystemObjectInfo>>("Children"); }
        private set { base.SetValue("Children", value); }
    }

    public ImageSource ImageSource
    {
        get { return base.GetValue<ImageSource>("ImageSource"); }
        private set { base.SetValue("ImageSource", value); }
    }

    public bool IsExpanded
    {
        get { return base.GetValue<bool>("IsExpanded"); }
        set { base.SetValue("IsExpanded", value); }
    }

    public FileSystemInfo FileSystemInfo
    {
        get { return base.GetValue<FileSystemInfo>("FileSystemInfo"); }
        private set { base.SetValue("FileSystemInfo", value); }
    }

    private DriveInfo Drive
    {
        get { return base.GetValue<DriveInfo>("Drive"); }
        set { base.SetValue("Drive", value); }
    }

    #endregion

    #region Methods

    private void AddDummy()
    {
        this.Children.Add(new DummyFileSystemObjectInfo());
    }

    private bool HasDummy()
    {
        return !object.ReferenceEquals(this.GetDummy(), null);
    }

    private DummyFileSystemObjectInfo GetDummy()
    {
        var list = this.Children.OfType<DummyFileSystemObjectInfo>().ToList();
        if (list.Count > 0) return list.First();
        return null;
    }

    private void RemoveDummy()
    {
        this.Children.Remove(this.GetDummy());
    }

    private void ExploreDirectories()
    {
        if (!object.ReferenceEquals(this.Drive, null))
        {
            if (!this.Drive.IsReady) return;
        }
        try
        {
            if (this.FileSystemInfo is DirectoryInfo)
            {
                var directories = ((DirectoryInfo)this.FileSystemInfo).GetDirectories();
                foreach (var directory in directories.OrderBy(d => d.Name))
                {
                    if (!object.Equals((directory.Attributes & FileAttributes.System), FileAttributes.System) &&
                        !object.Equals((directory.Attributes & FileAttributes.Hidden), FileAttributes.Hidden))
                    {
                        this.Children.Add(new FileSystemObjectInfo(directory));
                    }
                }
            }
        }
        catch
        {
            /*throw;*/
        }
    }

    private void ExploreFiles()
    {
        if (!object.ReferenceEquals(this.Drive, null))
        {
            if (!this.Drive.IsReady) return;
        }
        try
        {
            if (this.FileSystemInfo is DirectoryInfo)
            {
                var files = ((DirectoryInfo)this.FileSystemInfo).GetFiles();
                foreach (var file in files.OrderBy(d => d.Name))
                {
                    if (!object.Equals((file.Attributes & FileAttributes.System), FileAttributes.System) &&
                        !object.Equals((file.Attributes & FileAttributes.Hidden), FileAttributes.Hidden))
                    {
                        this.Children.Add(new FileSystemObjectInfo(file));
                    }
                }
            }
        }
        catch
        {
            /*throw;*/
        }
    }

    #endregion

    void FileSystemObjectInfo_PropertyChanged(object sender, System.ComponentModel.PropertyChangedEventArgs e)
    {
        if (this.FileSystemInfo is DirectoryInfo)
        {
            if (string.Equals(e.PropertyName, "IsExpanded", StringComparison.CurrentCultureIgnoreCase))
            {
                if (this.IsExpanded)
                {
                    this.ImageSource = Shell.FolderManager.GetImageSource(this.FileSystemInfo.FullName, ItemState.Open);
                    if (this.HasDummy())
                    {
                        this.RemoveDummy();
                        this.ExploreDirectories();
                        this.ExploreFiles();
                    }
                }
                else
                {
                    this.ImageSource = Shell.FolderManager.GetImageSource(this.FileSystemInfo.FullName, ItemState.Close);
                }
            }
        }
    }

    private class DummyFileSystemObjectInfo : FileSystemObjectInfo
    {
        public DummyFileSystemObjectInfo()
            : base(new DirectoryInfo("DummyFileSystemObjectInfo"))
        {
        }
    }
}

Now, let's go the XAML and WPF stuff bindings.

We need to create a new Window object in our solution and add a new TreeView inside it. See below the code.

<Window x:Class="CodesDirectory.WIN_TreeViewWithIcon"
        xmlns="http://schemas.microsoft.com/winfx/2006/xaml/presentation"
        xmlns:x="http://schemas.microsoft.com/winfx/2006/xaml"
        xmlns:classes="clr-namespace:CodesDirectory.Classes"
        Title="WIN TreeView with System Icons" Height="300" Width="300">
    <TreeView Name="treeView" Margin="5"></TreeView>
</Window>

We also need to override the default style of the items. In this case the ItemContainerStyle value should be modified. But unlike with other Style we only bind the IsExpanded property of the TreeViewItem into the IsExpanded property of FileSystemObjectInfo class (two-way direction). So every user action in the TreeViewItem state will also be applied in the bound objects. See below our new code.

<Window x:Class="CodesDirectory.WIN_TreeViewWithIcon"
        xmlns="http://schemas.microsoft.com/winfx/2006/xaml/presentation"
        xmlns:x="http://schemas.microsoft.com/winfx/2006/xaml"
        xmlns:classes="clr-namespace:CodesDirectory.Classes"
        Title="WIN TreeView with System Icons" Height="300" Width="300">
    <TreeView Name="treeView" Margin="5">
        <TreeView.ItemContainerStyle>
            <Style TargetType="{x:Type TreeViewItem}">
                <Setter Property="IsExpanded" Value="{Binding IsExpanded, Mode=TwoWay}" />
                <Setter Property="KeyboardNavigation.AcceptsReturn" Value="True" />
            </Style>
        </TreeView.ItemContainerStyle>
    </TreeView>
</Window>

After that in the Resources property of the TreeView object. We have to use the HierarchicalDataTemplate object and targets the actual FileSystemObjectInfo class in the DataType property. With the use of this object, we can set the actual template that the TreeViewItem has participated. In our case, we need to create a template where there is an Image in the left and Label in the right. The image will do display the actual icon of the file system, it binds the ImageSource property of the FileSystemObjectInfo class, and the Label will be bind in the Name property of the FileSystemInfo (of type System.IO.FileSystemInfo) property of the FileSystemObjectInfo class. See below our actual codes now.

<Window x:Class="CodesDirectory.WIN_TreeViewWithIcon"
        xmlns="http://schemas.microsoft.com/winfx/2006/xaml/presentation"
        xmlns:x="http://schemas.microsoft.com/winfx/2006/xaml"
        xmlns:classes="clr-namespace:CodesDirectory.Classes"
        Title="WIN TreeView with System Icons" Height="300" Width="300">
    <TreeView Name="treeView" Margin="5">
        <TreeView.ItemContainerStyle>
            <Style TargetType="{x:Type TreeViewItem}">
                <Setter Property="IsExpanded" Value="{Binding IsExpanded, Mode=TwoWay}" />
                <Setter Property="KeyboardNavigation.AcceptsReturn" Value="True" />
            </Style>
        </TreeView.ItemContainerStyle>
        <TreeView.Resources>
            <HierarchicalDataTemplate DataType="{x:Type classes:FileSystemObjectInfo}" ItemsSource="{Binding Path=Children}">
                <StackPanel Orientation="Horizontal">
                    <Image Source="{Binding Path=ImageSource, UpdateSourceTrigger=PropertyChanged}" Margin="0,1,8,1"></Image>
                    <TextBlock Text="{Binding Path=FileSystemInfo.Name}"></TextBlock>
                </StackPanel>
            </HierarchicalDataTemplate>
        </TreeView.Resources>
    </TreeView>
</Window>

Lastly, in the code behind, we need to explore the top level drives and add each drive in the FileSystemObjectInfo wrapper class and append it to the TreeView.Items property. See below the codes on how to do it.

public partial class WIN_TreeViewWithIcon : Window
{
    public WIN_TreeViewWithIcon()
    {
        InitializeComponent();
        var drives = DriveInfo.GetDrives();
        foreach (var drive in drives)
        {
            this.treeView.Items.Add(new FileSystemObjectInfo(drive));
        }
    }
}

And, congratulations to you for finishing this blog. You are now equipped with a new interesting programming technique called Shell.

Please follow us and be part of this blog site for the more very interesting stuff.